
3 Methods to Convert Camcorder Tapes or Videos to DVD
 2.5K
2.5K
 0
0


"The MiniDV tape has gotten damp. When I play it on my old camcorder, the picture shows stripes and noise. I need to transfer the footage as soon as possible to prevent it from becoming unreadable later." - From Tommy, a former home video lover
Have your camcorder tapes faded, become damp, or started sticking together? Worried about losing your old home videos? Convert camcorder videos to DVDs now - same nostalgic feel, but with way better durability. This article will introduce 3 effective ways to back up videos from tape-based or tapeless digital camcorder to DVD.
A Comparison of Common Camcorder Formats
Before you start burning your camcorder to DVD, make sure you know the popular formats, which helps you pick the right conversion method.
| Format | Type | Resolution | Feature | How to transfer |
|---|---|---|---|---|
| VHS-C | Analog | 240-330 lines | Compact VHS version, require adapter for VCR playback. | Transfer analog signals via AV or S-Video cables. |
| Hi8 | Analog | 400 lines | Enhanced 8mm format with improved video/audio quality. | Same as VHS-C, require analog transferring. |
| MiniDV | Digital | 480 lines | Fully digital recording system, half the size of the Video8 format. | Capture lossless digital video through a FireWire connection. |
| Digital8 | Digital | 520 lines | A high-definition analog video format recorded on 8mm cassette tapes. | Same as MiniDV, FireWire lossless capture is preferred. |
| Digital media cards (MP4, AVCHD videos) | Digital | HD/4K | Record to SD cards in a file format for quick and easy access. | Copy digital files directly from the storage media. |
3 Camcorder to DVD Conversion Methods Overview
Now select a conversion method, depending on whether you prioritize simplicity, best quality, or a hands-off approach.
| Method | Use AV cable + DVD Recorder | Use FireWire + computer + DVD burner | Use transfer service |
|---|---|---|---|
| Pros |
|
|
|
| Cons |
|
|
|
| Best for | Users who own analog tapes, and digital tape users who prioritize simplicity over quality. | Digital tape users who prioritize quality and need to edit videos before burning. | Users who have tapes in any format and don’t want to make DVDs themselves. |
Next, let’s look at the detail steps for each method.
Method 1. Record Directly with a Camcorder Tapes to DVD Recorder
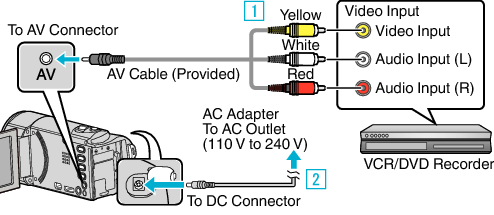
Video from old camcorder tapes is transferred to DVD recorders via analog signals. The DVD recorder then compresses the video at a fixed bitrate and records it onto a DVD disc. Each transfer and recording causes irreversible quality loss. If your camcorder has an S-Video port, use it to make the picture a lot clearer.
Steps:
1. Connect your VHS-C or Hi8 camcorder and DVD recorder with an AV cable (yellow for video, white & red for left & right audio). Note: If there is an S-Video cable, replace the yellow video cable in the AV cable.
2. Use the DVD recorder's remote and press the "Input" or "Source" button until you see the input that matches your camcorder connection.
3. (Optional) Switch the TV to the input connected to the DVD recorder to monitor the recording process more easily.
4. Insert a blank DVD disc into the recorder.
5. Start playing your camcorder tape.
6. Press the DVD recorder's “REC” button.
7. Check playback progress on TV, once finished, pause “STOP” immediately.
8. In the DVD recorder menu, finalize the disc to make the it playable other DVD players.
Method 2. Capture and Burn Camcorder Video to DVD on Your Computer
This method is suitable for converting video from digital tapes and digital media cards to DVD. It will keep the best video quality.
#1 Transfer camcorder videos to computer
For MiniDV and Digital8 digial tapes:
1. Hook up your camcorder to your Windows or Mac computer, just plug in that FireWire cable. No FireWire port? Grab a FireWire to USB-C or FireWire to Thunderbolt adapter.
2. Flip your camcorder to Play/VTR/VCR mode.
3. Fire up your favorite video capture/editing program on your computer - anything like iMovie, Final Cut, or WinDV will do the trick.
4. Find the camcorder file and import it.
5. Make some edits if you want, then save the camcorder file in video format.
Check out the video guide for more information
For modern camcorders:
Now importing footage from a new camcorder to your computer is incredibly simple. You can generally use one of these 3 ways:
- Connect it directly to your computer via a USB cable, then copy the files.
- Insert SD card into a card reader connected to your computer.
- Connect both devices to the same Wi-Fi and use the manufacturer's software to wirelessly transfer the footage.
For steps related to your camcorder or model, view its official website or reach out to customer support.
#2 Convert camcorder videos to DVD with a DVD Burner
Cisdem DVD Burner stands out as one of the best camcorder to DVD burners for Mac and Windows, thanks to simple design and powerful features. It allows you to edit videos, self-define the DVD menu, preview files, burn videos, and more. Each function has a separate interface, which covers the required customization options.
Most importantly, it supports tons of input formats, so you are capable of burning digital camcorder videos from any format like DV, MP4, MKV, H264, MTS, M2TS, MPEG, WMV, etc. to DVD.
Steps:
1. Download, install, and open Cisdem DVD burner on your computer.
 Free Download Windows 10 or later
  Free Download macOS 10.13 or later
2. Import Camcorder videos. Drag and drop the transferred camcorder files to the "Source" interface.
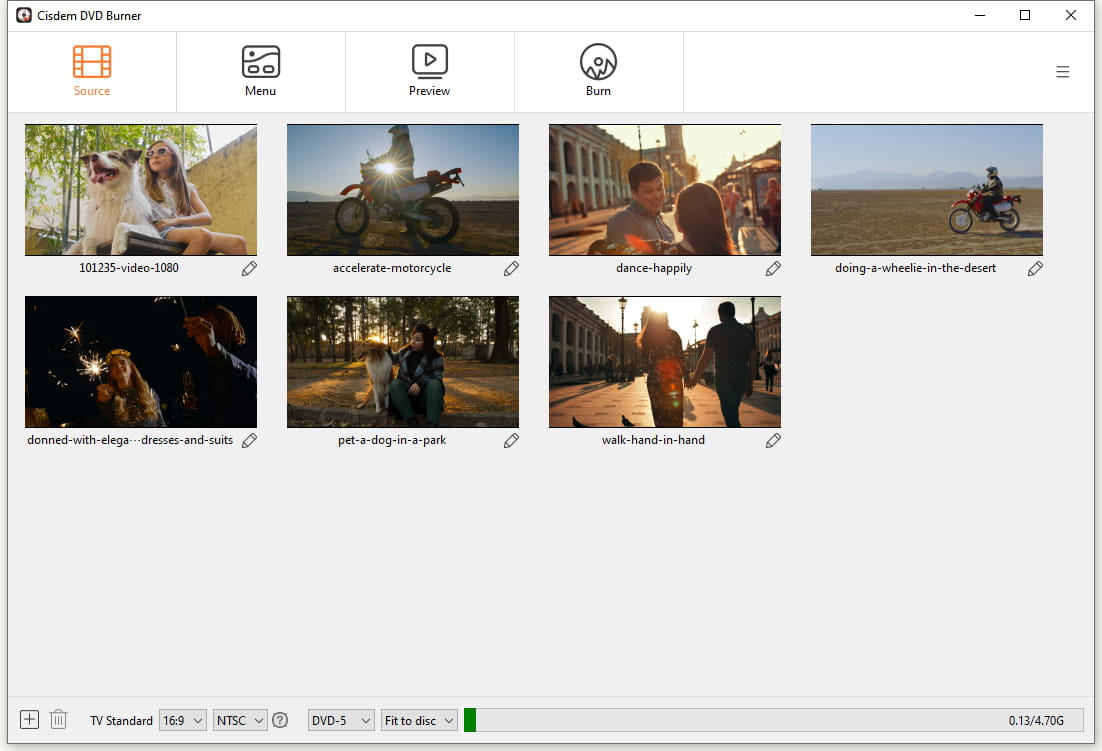
3. Configure TV standard and quality.
- Choose the TV aspect ratio as your source video.
- Choose NTSC or PAL. If you're not sure, click the question mark icon next to it and select your country.
- Select a quality option. If you want the highest quality, choose the “Best” option.
4. Edit Camcorder videos.
Choose a video you wish to edit and hit  to bring up a video editor. From there, you can crop and rotate the video, adjust visual effects, put personal watermarks, divide long camcorder files into chapters, etc.
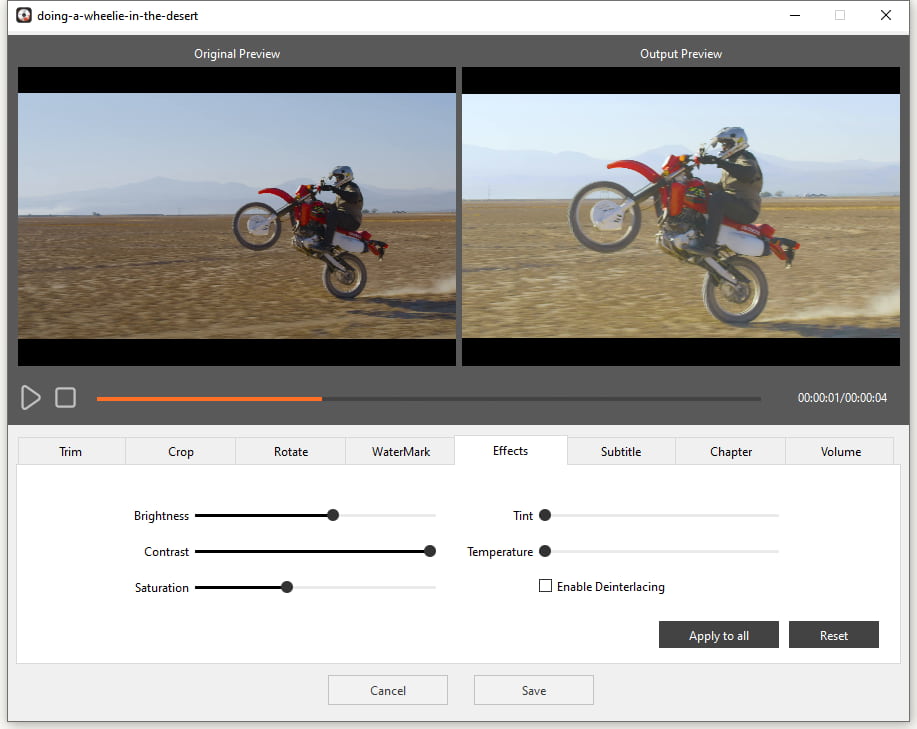
Also, you can skip this step to keep original videos.
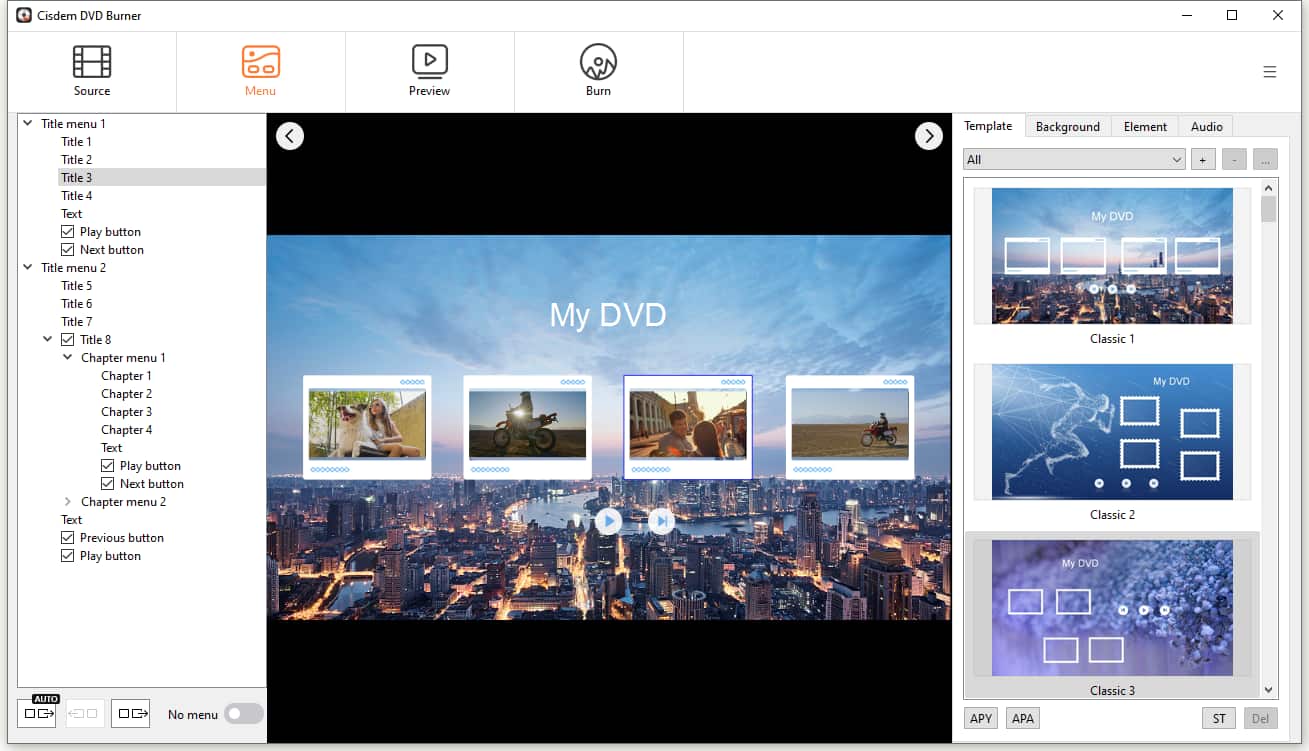
5. Customize DVD menu.
Switch to the “Menu” tab and then menu templates show up. Select your preferred one or regroup elements in a template. If background images don't fit your camcorder video theme, you can upload a suitable one from your local folder.
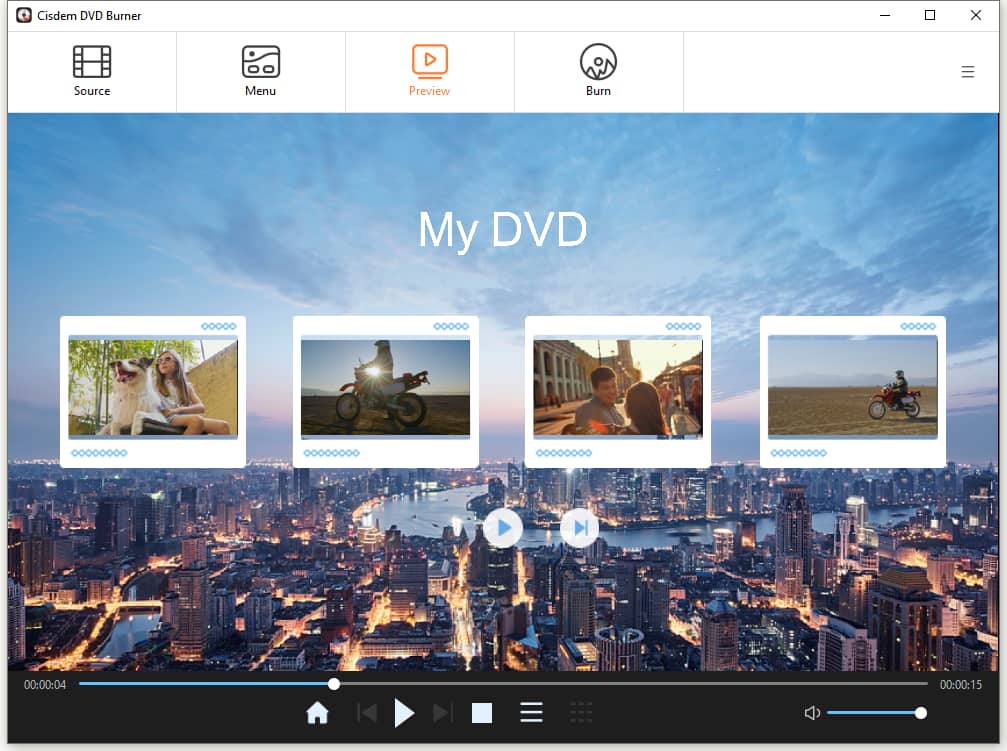
6. Preview your created DVD before burning it.
- Make sure the menu elements are showing up right.
- Check that the different titles are playing correctly. If you've made any edits, see that those changes show up.
- Also, see if the chapter jumps are working properly if you've added chapters.
7. Finish burn settings.
Go to the “Burn” interface. The “Burn to Disc” option is selected by default, so what you need to do is set the DVD name, workspace, playback mode, and copies number.
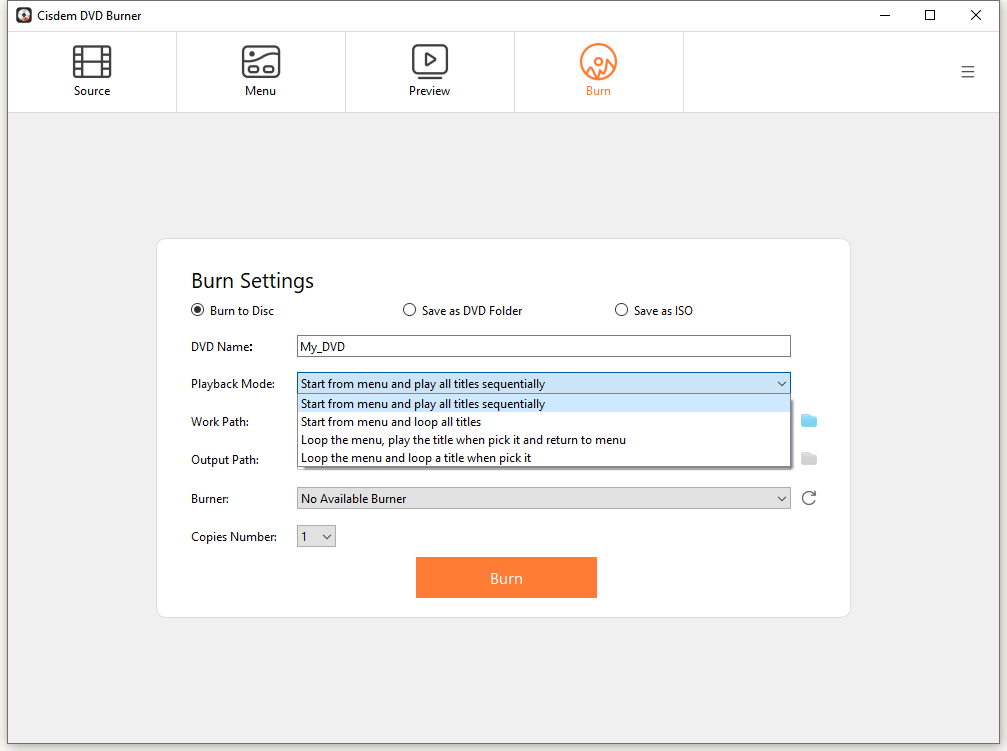
8. Insert a blank DVD disc and click the “Burn” button to burn Camcorder to DVD on Mac or Windows.
FAQ: Can I transfer MiniDV or Digital8 camcorder to computer via AV or S-Video label, then burn videos with Cisdem DVD Burner?
Yes. You can hook up your camcorder to a video capture device with a cable, then plug the device into your computer. Use OBS Studio to record the footage directly to your hard drive.
Popular YouTuber - Audrie Storme tried this method. You can watch her video to You can watch the video to learn her step-by-step instructions. However, using an A/V analog output will degrade the video quality captured by a digital camcorder.
Method 3. Use a Professional Camcorder to DVD Transfer Service
If you don't want to buy those one-time-use gadgets or spend time learning complicated procedures, just hand it over to a third-party forwarding service. The only thing you pay for is money, and if you're dealing with a lot of tapes, the cost can get pretty steep.
Steps:
1. Head to the service provider’s website, pick a package like "Videotape to DVD", Pricing typically depends on the number of videotapes you have and your desired final output, such as DVD, USB, and Cloud.
2. Place the order, get the order number and shipping label.
3. Securely package camcorder tapes along with your order information.
4. Stick on the shipping label, and send it out with a trackable service.
5. The video transfer service will send a confirmation email upon receipt. Processing usually takes 2-4 weeks.
6. Once you get the return package, check the original tape right away and test the DVD playback quality.
![]()
Notes on using camcorder to DVD service:
- Compare multiple service providers. Select the best one based on reputation, reviews, price, and other factors.
- Carefully review all included services and be wary of hidden fees.
- Before you order, ask if they can fix tapes that won’t play. Also, for MiniDV tapes, do they use FireWire or just record with analog cables? I guess their batch recordings might not be as sharp as if you used FireWire yourself.
Final Words
Method 1 is the simplest solution for transferring analog tapes.
Method 2 provides the best video quality for digital tapes.
Method 3 delivers a worry-free experience.
Choose your favorite method and start converting your camcorder tapes or videos to DVD immediately, or the tapes will deteriorate further. Moldy tapes can't be handled; you can check them yourself or have an online transfer service confirm.

Jenny is a technology editor who has been blogging since she was a student. Since joining Cisdem, she focuses on writing articles about video software and how-to guides. She loves exploring new tools and techniques.

JK Tam is the lead developer at Cisdem, bringing over two decades of hands-on experience in cross-platform software development to the editorial team. He is now the lead technical approver for all articles related to Data Recovery and DVD Burner.